 It was well that Governor Poplicola accepted his bribe, If he had not, Centurion Catulus had other, less pleasant orders. Luckily for Poplicola, the only heads rolling were on the coins that slipped through his greedy, fat fingers.
Monday, September 24, 2007
Cappadocia sides with Alanicus (Campaign 68)
The Governor of Cappadocia weighs up his options in the raging civil war and decides to back the latest contender. In doing so, he added yet another Province to the Alanicus war machine. In a matter of four months, Alanicus ( with the help of his Denarii) had persuaded five large and powerful Provinces to come over to him. He was now stretching his hand out further East into the territory of Syria and Mesopotamia. There, many Legions had been stationed to meet the Parthian threat, If they could be bought as easily as their Provincial Governors, Alanicus would be a power to be reckoned with indeed. It was well that Governor Poplicola accepted his bribe, If he had not, Centurion Catulus had other, less pleasant orders. Luckily for Poplicola, the only heads rolling were on the coins that slipped through his greedy, fat fingers.
It was well that Governor Poplicola accepted his bribe, If he had not, Centurion Catulus had other, less pleasant orders. Luckily for Poplicola, the only heads rolling were on the coins that slipped through his greedy, fat fingers.Saturday, September 22, 2007
Alanicus the benevolent (Campaign 67)
With the armies of the West still dazed by their resent set too, Alanicus sees his chance for a quick land grab of own. It is now that he openly declares himself as Emperor and sets his own War machine in motion.
The first Province to go over to Alanicus is Macedonia, Alanicus has been working on the officials of the Province in his lead up to conquest and with a tidy sum of Denarii each, they gladly flock to his banner. Alanicus now uses the immense wealth of the Eastern provinces to build an amphitheatre in Thrace, a very generous thing to do people say, so early on in the Campaign, but Alanicus nods graciously and says "This is just the tip of what I can offer you If I assend to the throne". With this statement the Provinces of Asia and Pontus, long disillusioned with Rome come over to his side. There has been much unhappiness and unrest in the East since the start of the war and it is this discord that Alanicus now capitalises on. Alanicus is using his vast collected wealth to draw the greedy Provinces to him like moths to a flame.
A great, vast marble quarry is established in Macedonia and in that same month, Galatia bows to his will, with the help of a few Denarii of course. With his immense generosity, Alanicus is gathering much support in the East and is soon known as Alanicus the Benevolent, everything is going much to his plan, by the time Secundus and the other one find out what's going on, Alanicus will have armies of his own.
The new Emperor has risen in the East and will soon set in the West....on the throne of Rome no less, If his treasury holds out that is.
The first Province to go over to Alanicus is Macedonia, Alanicus has been working on the officials of the Province in his lead up to conquest and with a tidy sum of Denarii each, they gladly flock to his banner. Alanicus now uses the immense wealth of the Eastern provinces to build an amphitheatre in Thrace, a very generous thing to do people say, so early on in the Campaign, but Alanicus nods graciously and says "This is just the tip of what I can offer you If I assend to the throne". With this statement the Provinces of Asia and Pontus, long disillusioned with Rome come over to his side. There has been much unhappiness and unrest in the East since the start of the war and it is this discord that Alanicus now capitalises on.
 Alanicus is using his vast collected wealth to draw the greedy Provinces to him like moths to a flame.
A great, vast marble quarry is established in Macedonia and in that same month, Galatia bows to his will, with the help of a few Denarii of course. With his immense generosity, Alanicus is gathering much support in the East and is soon known as Alanicus the Benevolent, everything is going much to his plan, by the time Secundus and the other one find out what's going on, Alanicus will have armies of his own.
The new Emperor has risen in the East and will soon set in the West....on the throne of Rome no less, If his treasury holds out that is.
Sunday, September 16, 2007
Alanicus shows his hand (Campaign 66)
 After a year of waiting and watching from a distance, Aulus Proctavius Alanicus steps from the shadows of the East to make his bid for power. Left to his own devices, as the leading men of the West fight it out, Alanicus has been busy preparing an army of his own. Since the Civil war began, Alanicus had designs on the throne for himself, at first he had planned to let the contenders cut themselves to pieces and then mop up who ever was left, but as the year dragged on with no real winner in sight, Alanicus's patience finally ran out. He decided to take what was rightfully his, the title of Emperor.
With his amassed army groaning and slipping away by the day, Alanicus knew he couldn't stay hidden for much longer and decided to act, much to the delight of his bored Legions who had spent the last eight months in secret staging grounds in Thrace.
Both Tullus and Secundus had herd reports earlier in the year of Alanicus in the East, but had laughed it off with contempt. Now with the army of Thrace and the renown III Gallica behind him, their laughter would soon die away. There were now three in the race for the throne and every one knew, there could be only one first citizen of Rome.
Saturday, September 15, 2007
Tullus hardens the army of North Africa (Campaign 65)
After the resent victory at the battle of Valentia, would be emperor Tullus was shocked in the way that the vexilations from North Africa were swept from the field, almost spelling defeat for his quest for the throne. Needing replacements badly he dispatched Centurion Metellus of the 1st Cohort, VI Gemina, to Africa, to bring back the much needed re-enforcements. However, Tullus gave Metellus strict orders to beat them into shape first........quite literally. Centurion Metellus was not impressed at what he found on arriving in Numidia and the state at which standards had dropped. With most of the III Augusta still in reasonable shape, Metellus turned his trained eye on the Auxiliaries of the Province. It was them who would help swell the ranks of Tullus's war machine.
Within weeks a rag tag bunch of City guards had been retrained and drilled into a disciplined Cohort of spearman, to send against the Germans of Secundus. These dark skinned Lybians were armed with the weapon of their home land, a 12ft thrusting spear, a rare sight on the battle field and one that Metellus thought might inspire a little shock and awe in the armies of the North.
Gaming Note; Organising the army of North Africa is one thing I've been meaning to do for a long time, with all its varied troop types it could have great character. First up on the painting table are these Lybian spear men from Renegade Miniatures. They are from the Punic war collection, but with a little bit of imagination and tweaking, they will become ex-city guards beaten into shape and turned into a cohort of the line. I thought I would give them Carthage style spears to add to their look and to make them very different from anything else in the Roman ranks. I'm also toying with the idea of putting the my newly completed Evocati Cohort into the army of North Africa, as many veterans were settled there.

 Centurion Metellus was not impressed at what he found on arriving in Numidia and the state at which standards had dropped. With most of the III Augusta still in reasonable shape, Metellus turned his trained eye on the Auxiliaries of the Province. It was them who would help swell the ranks of Tullus's war machine.
 Within weeks a rag tag bunch of City guards had been retrained and drilled into a disciplined Cohort of spearman, to send against the Germans of Secundus. These dark skinned Lybians were armed with the weapon of their home land, a 12ft thrusting spear, a rare sight on the battle field and one that Metellus thought might inspire a little shock and awe in the armies of the North.
Gaming Note; Organising the army of North Africa is one thing I've been meaning to do for a long time, with all its varied troop types it could have great character. First up on the painting table are these Lybian spear men from Renegade Miniatures. They are from the Punic war collection, but with a little bit of imagination and tweaking, they will become ex-city guards beaten into shape and turned into a cohort of the line. I thought I would give them Carthage style spears to add to their look and to make them very different from anything else in the Roman ranks. I'm also toying with the idea of putting the my newly completed Evocati Cohort into the army of North Africa, as many veterans were settled there.
Putting a name to the face
On buying the Osprey book ' The Roman Army of the Punic Wars 264-146 BC' I discovered a huge list of Roman commanding Generals in the back. The list was so long with so many fantastic names it gave me an idea. I would use this list to name all of my Centurions and other officers in my Roman forces. The idea didn't stop there, to give more character to each of them, I devised a 1 to 10 table to roll on for their stats e.g +1 to str or +1 to attacks. The Centurions I wanted to be mostly a plus of one sort or another for they had been promoted on example and merit. Whereas the table I drew up for the Higher Officers, the Legates and Tribunes is less positive and has a 50/50 chance of being something bad, a minus. For example an unlucky roll on the High Officer Table could see out of touch Generals receiving a -1 on their leadership, wounds or attacks. These bad officers have obviously been promoted beyond their means, by friends in high places and do their men little favours once in the field. I'm hoping these personalities will bring a bit more colour and life to the board and make great blogging throughout the Campaign.
 With the all the Centurions carefully named, I wrote out their names on stickers for the bases and added the name and altered stats to the unit cards of the Officers involved. To keep things simple I gave each Centurion just one single name e.g Varro or Balbus so that after a while these names will be easy to remember and real characters will leap from the board. The men of higher rank I gave the Full Roman title of three names. An example of a high officer would be L.Lunis Pullus, who has now become the General of the Rhine army. Again I'm hoping that these names will sink in after a few battles and might even give a sense of loss when well known characters fall, or lucky ones do well, old Linus Pullus has done it again...I don't believe it! that crafty old fox.
 Now my Centurions Vitus and 1st Spear Centurion 'Bulla', made famous through the blog, have now got faces to their names and their stats have been rolled and altered. I gave the 1st spears an option of rolling twice and choosing the better roll, this reflects their experience and status in the ranks. The other Centurions aren't as lucky and have to except what the Gods ordain on them. Old war dog 'Bulla' ended up with a weapon skill of 4 which isn't great for attacks but means he has a better chance of scoring a hit in combat. However, Tullus's 1st spear, the renown Terentius, bagged the war hero slot of 10 and walked away with an attack of 3 rolls and a strength of 4. He will be one to avoid at all costs and may even turn the tide of a few battles. Terentius will be a name that people will learn to remember and I'm sure one that goes down in the annuals, "Oh woe to the conquered."
 It may turn out that in the heat of battle who has what and toughness and strength they are and so forth may get in the way of the game, but with the unit cards on hand I'm hoping it won't. We will just have to see about that one, but it is great to know that all the characters have names and personalities even if we do drop their skills.

Above, 1st spear Centurion Messala (tough old war dog, Toughness 4) from the army of Rome, takes some welcome advice from an old friend.
The idea didn't stop there, to give more character to each of them, I devised a 1 to 10 table to roll on for their stats e.g +1 to str or +1 to attacks. The Centurions I wanted to be mostly a plus of one sort or another for they had been promoted on example and merit. Whereas the table I drew up for the Higher Officers, the Legates and Tribunes is less positive and has a 50/50 chance of being something bad, a minus. For example an unlucky roll on the High Officer Table could see out of touch Generals receiving a -1 on their leadership, wounds or attacks. These bad officers have obviously been promoted beyond their means, by friends in high places and do their men little favours once in the field. I'm hoping these personalities will bring a bit more colour and life to the board and make great blogging throughout the Campaign. With the all the Centurions carefully named, I wrote out their names on stickers for the bases and added the name and altered stats to the unit cards of the Officers involved. To keep things simple I gave each Centurion just one single name e.g Varro or Balbus so that after a while these names will be easy to remember and real characters will leap from the board. The men of higher rank I gave the Full Roman title of three names. An example of a high officer would be L.Lunis Pullus, who has now become the General of the Rhine army. Again I'm hoping that these names will sink in after a few battles and might even give a sense of loss when well known characters fall, or lucky ones do well, old Linus Pullus has done it again...I don't believe it! that crafty old fox. Now my Centurions Vitus and 1st Spear Centurion 'Bulla', made famous through the blog, have now got faces to their names and their stats have been rolled and altered. I gave the 1st spears an option of rolling twice and choosing the better roll, this reflects their experience and status in the ranks. The other Centurions aren't as lucky and have to except what the Gods ordain on them. Old war dog 'Bulla' ended up with a weapon skill of 4 which isn't great for attacks but means he has a better chance of scoring a hit in combat. However, Tullus's 1st spear, the renown Terentius, bagged the war hero slot of 10 and walked away with an attack of 3 rolls and a strength of 4. He will be one to avoid at all costs and may even turn the tide of a few battles. Terentius will be a name that people will learn to remember and I'm sure one that goes down in the annuals, "Oh woe to the conquered." It may turn out that in the heat of battle who has what and toughness and strength they are and so forth may get in the way of the game, but with the unit cards on hand I'm hoping it won't. We will just have to see about that one, but it is great to know that all the characters have names and personalities even if we do drop their skills.
Above, 1st spear Centurion Messala (tough old war dog, Toughness 4) from the army of Rome, takes some welcome advice from an old friend.
Wednesday, September 12, 2007
The Villa is finished
Here is a turn around of the finished Villa with its finished doors and windows. I had real fun in researching this project and I'm quite pleased with the results, although I think I've made the tiles a little too rough and ready for a Roman Villa...oh well. I plan to make another similar building quite soon so maybe I'll try something different. In a way, the rough tiles to me make the Villa look very British and weather beaten, so I think the look is actually starting to grow on me. Next up is the base, on which will be a walled garden with fruit trees etc, First I need to find a suitable piece of wood to base it on.
 In colder, wetter countries, Villas adopted the covered colonnade to keep out the rain and snow. These were very common in Britannia (no surprise there). However, with Tony being from Rome, he has decided to have the best of both worlds and has also Incorporated an open colonnade at the front, from the Italian styled Villas of home.


 All in all, this Villa has been about thirty hours in the making. Fun though I have to say and a very educational too. Unfortunately Tony won't have time to enjoy his new home, after he receives a bear skin cloak made of Milliput, he is off to join the Army of the Rhine's high command, along with some of those drunken officers seen earlier. Don't worry he'll be fine, mind you he will need all that fur lining where he's going.

 In colder, wetter countries, Villas adopted the covered colonnade to keep out the rain and snow. These were very common in Britannia (no surprise there). However, with Tony being from Rome, he has decided to have the best of both worlds and has also Incorporated an open colonnade at the front, from the Italian styled Villas of home.

 All in all, this Villa has been about thirty hours in the making. Fun though I have to say and a very educational too. Unfortunately Tony won't have time to enjoy his new home, after he receives a bear skin cloak made of Milliput, he is off to join the Army of the Rhine's high command, along with some of those drunken officers seen earlier. Don't worry he'll be fine, mind you he will need all that fur lining where he's going.
Bringing the Villa to life
33. Looking pretty Roman to me, all that's left now are the doors and rafters. Almost done.
 32. For me the real cherry on the cake was when I got to paint the red surrounding border along the building base, that to me, makes it shout out Roman.
 31. The walls are painted white....of course.
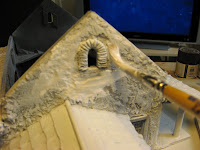
 30. With the model completed I took about under coating it in acrylic paints, spraying the roof tiles black at first to give them better shading.
 32. For me the real cherry on the cake was when I got to paint the red surrounding border along the building base, that to me, makes it shout out Roman.31. The walls are painted white....of course.30. With the model completed I took about under coating it in acrylic paints, spraying the roof tiles black at first to give them better shading.
Doors finished
 "Alright, alright...enough about the bloody making of the thing! get on with the painting man! for the Sweet love of Jupiter!"
 29. With the Milliput door surrounds dry I now added the Bolsa wood doors. Again, I scored them with a pencil and tried to get as much detail as I could into the hinges and cross bars. This was done by carefully dotting tiny drops of Super glue with a needle along the cross bars, when dry and painted they will give the effect of iron rivets.
Window and Door details
28. Colonnade all plasted and detailed. I left some of the Polyfiller quite rough in places to pick up the texture, when I came to dry brush the model later. 27. A shot showing the colonnade window details. It took a bit of time to get the Milliput to stick to the Poly filler but as the Milliput grew more tacky as it dried in the air, it became a lot easier.
 26. With a model that will be used with tiny detailed figures I think it's important to spend time trying to get the building just as detailed, so the two sit together better of the board.
 25. Using the Warhammer illustration as reference again, I started to put in the really fine detail around the windows and doors. This was done using Milliput and a modelling tool. It was quite tricky but again the results would be worth it in the end.
 27. A shot showing the colonnade window details. It took a bit of time to get the Milliput to stick to the Poly filler but as the Milliput grew more tacky as it dried in the air, it became a lot easier.26. With a model that will be used with tiny detailed figures I think it's important to spend time trying to get the building just as detailed, so the two sit together better of the board. 25. Using the Warhammer illustration as reference again, I started to put in the really fine detail around the windows and doors. This was done using Milliput and a modelling tool. It was quite tricky but again the results would be worth it in the end.
Plastered!
25. Here is the end result...and look who's turned up now the hard work has been done.
 24. Time to call in the plasterers. I used fine surface Polyfiller to give the Villa a plastered look.
 23. The time taken will the tweezers and balsa wood sticks really pays off in the colonnade roofing.
 22. Here's a shot of the main door. I had to do a lot of searching through my books to find this reference, but finally struck gold in a book about Hadrian's wall. The cross bars will be painted to look like iron and given rivets made from drops of Super glue.
 24. Time to call in the plasterers. I used fine surface Polyfiller to give the Villa a plastered look.23. The time taken will the tweezers and balsa wood sticks really pays off in the colonnade roofing.22. Here's a shot of the main door. I had to do a lot of searching through my books to find this reference, but finally struck gold in a book about Hadrian's wall. The cross bars will be painted to look like iron and given rivets made from drops of Super glue.
New day and the sun's up
21. back inside, I set about putting the finer detail on the roof. These rafters are just cut up Bolsa wood sticks. This was quite pain staking work but I knew it would be worth the effort, It was around about now I finally realized this was going to be an all or nothing project.
 20. With Tony moaning about the noisy night I thought it was time to add the doors. I made these out of Bolsa wood, which I had scored with a pencil to make a plank effect in the door. Spending a little extra time on tiny details like these really pays off when the model gets painted.
 19. A proud little Roman shows off his new house.
 18. A new day brings new ideas and both Tony and I are up at the crack of dawn.
 17. With out any windows or doors in place, Tony was kept awake all night by drunken passers by.
 20. With Tony moaning about the noisy night I thought it was time to add the doors. I made these out of Bolsa wood, which I had scored with a pencil to make a plank effect in the door. Spending a little extra time on tiny details like these really pays off when the model gets painted.19. A proud little Roman shows off his new house.18. A new day brings new ideas and both Tony and I are up at the crack of dawn.17. With out any windows or doors in place, Tony was kept awake all night by drunken passers by.
making slaves quarters into the night
14. It's getting late now and little Tony is no where to be seen, Romans never stay up too late. The roof below is now completely finished with a piece of dowling along the apex of the structure to look like capping tiles. So far I've clocked up about eight hours of cutting and sticking. Time for a break, I think I need one....where's Tony got too?
 13. This being the slave quarters and hidden from sight around the back of the Villa, I decided to make it look a little second class. The slaves would have to live with tiny windows and a small wooden door. Still, what it lacked in style it made up for in charm. When finished, this little corner of the Villa with its wooden detail would be my favourite part of the building.
 12. Although I hadn't planned it, I thought the Villa looked a little small so I started to work out another 'wing' to add onto the end of the building. I would have liked it to be quite large, but the base had to be brought into consideration, so I opted for something half way. The slave quarters were born.
 13. here we see the Villa with all of its roofing almost finished. look there's Tony, good of him to turn up at last.

 13. This being the slave quarters and hidden from sight around the back of the Villa, I decided to make it look a little second class. The slaves would have to live with tiny windows and a small wooden door. Still, what it lacked in style it made up for in charm. When finished, this little corner of the Villa with its wooden detail would be my favourite part of the building.12. Although I hadn't planned it, I thought the Villa looked a little small so I started to work out another 'wing' to add onto the end of the building. I would have liked it to be quite large, but the base had to be brought into consideration, so I opted for something half way. The slave quarters were born.13. here we see the Villa with all of its roofing almost finished. look there's Tony, good of him to turn up at last.
Tiling the roof and colonnade
12. The model is now tiled and looking more like a Villa with every passing hour. Up to now, I think I had spent about four to fives hours working on it,  11. Thin card was now cut into strips with tile designs drawn on them, these were layered on top of one another to make a roof effect. A jagged edge would give the roof a weathered look.
 10. Tony shows off his new colonnade. Well done Tony, that must of been hard work putting that up.
 9. Using Tony as a height guide, I cut measured lengths of wooden dowel to make an open Colonnade for the front of the house. Getting the spacing right was tricky and Tony was no help at all, claiming that maths was for Greeks and that all Greeks should be burnt, that front porch was hard work working with that little nutter. I was tempted to let the thing fall on his head, but he was proving to be too useful, for the time being at any rate.
11. Thin card was now cut into strips with tile designs drawn on them, these were layered on top of one another to make a roof effect. A jagged edge would give the roof a weathered look. 10. Tony shows off his new colonnade. Well done Tony, that must of been hard work putting that up. 9. Using Tony as a height guide, I cut measured lengths of wooden dowel to make an open Colonnade for the front of the house. Getting the spacing right was tricky and Tony was no help at all, claiming that maths was for Greeks and that all Greeks should be burnt, that front porch was hard work working with that little nutter. I was tempted to let the thing fall on his head, but he was proving to be too useful, for the time being at any rate.
Little Tony plans the roof and colonnade
Below, Little Tony over sees the construction of his new country Villa, If only he knew that when it was finished, it would have hundreds of dirty, sweaty soldiers stamping and crashing through it....I think he would choke on his Dormouse, best not tell him eh.

8. Ok, now we're getting somewhere. With the addition of a covered Colonnade (very Romano-British!) the foam card house starts to look more like a Villa. Up to now the Villa has been designed using the illustration from the Warhammer rule book, but now there is the front to think about and the far side, all of which will have to be designed from scratch. This problem would be worked out by sketches on the train to work and taking tips from other picture books.
 7. An idea a friend gave me and one that I had completely overlooked, was the possibility of removing the roof to place figures inside the building. I had planned to seal the structure up and have done with it but the suggestion was a good one and so it went into the mix. Thanks Alan.
 6. So using the book illustration, I started to recreate the shape of the building and work out the side doors and windows. Again, once you've cut the pieces out, the structure just seems to leap up and look almost finished. Tony helped again in getting the 'wings' of the Villa to scale and looking right.
  5. In this photo you can see the tiny line drawing that kicked my creative juices into overdrive. I tried to stay as close as I could to the illustration because ever since I saw it , It has always captured my imagination and I think it has loads of charm.
 7. An idea a friend gave me and one that I had completely overlooked, was the possibility of removing the roof to place figures inside the building. I had planned to seal the structure up and have done with it but the suggestion was a good one and so it went into the mix. Thanks Alan.
 6. So using the book illustration, I started to recreate the shape of the building and work out the side doors and windows. Again, once you've cut the pieces out, the structure just seems to leap up and look almost finished. Tony helped again in getting the 'wings' of the Villa to scale and looking right. 5. In this photo you can see the tiny line drawing that kicked my creative juices into overdrive. I tried to stay as close as I could to the illustration because ever since I saw it , It has always captured my imagination and I think it has loads of charm.
How to build a villa in six hundred and forty easy steps
4. Here you can see I've used Tony to measure up the doors and windows, It's important to remember that if you are going to spend the best part of forty hours making something, it's best to get the basics right at the beginning and for that, Tony was invaluable.
 3. Once the pieces had been worked out to scale and windows and doors arranged the actual construction of the Villa takes only a moment. Taping it together, I was able to make minor adjustments and tweaks, still using a 28mm figure as a scale guide....let's call him Tony.
 2. One of my first problems was to make up the rest of the Villa from my imagination. This was made easier when I found a great picture in a kids book I had at work, showing the front of a Villa and the Colonnade. Great! I thought, that will do.
 1. The most important thing I think, when making or drawing anything is to also do your research before hand and get plenty of reference. Even if you think you know everything there to know on a subject you will always surprise yourself. Being an artist, I gladly swallowed what pride I had long ago and jump straight for the reference books every time. So, as you can see, I first started to troll through every Roman book I had with villas in and not to my surprise, the best were children's history books. I started off cutting the end pieces of the Villa to get the height and used a figure for scale.
Subscribe to:
Posts (Atom)